Stripe
Stripe is a really hard to remove resource, it is recommended to run this module on livemode environment. If there's a need for multi envs, it is recommended to have a separate repository ONLY for Stripe's dev env.
Get Started
To start accepting payments for your online services, it is convenient to integrate with Payments Gateway.
Here, you'll be guided how to connect your app with Stripe. Most of it will be configured automatically, but some features are manual.
Before diving into the guide below, it is necessary to have Stripe account.
Once created, you'll have to complete your business profile (you'll be prompted by Stripe), otherwise you'll be able to use test environment only.
How to get API Key
runtyme-kit will use your Stripe account's API Key to perform operations automatically via GitHub Actions agent.
To get this API Key you need to go to your Stripe's dashboard and use Search bar to search for API Keys.
You should see something like this:
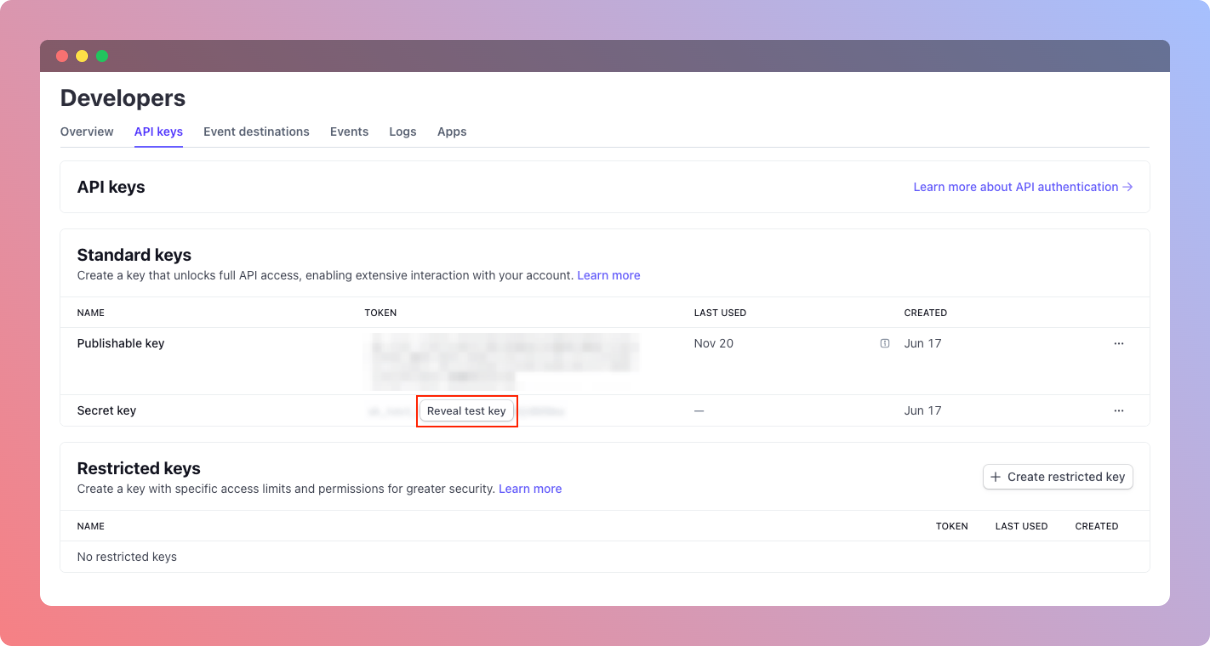
Find Secret key, click Reveal (test) key and copy it. You'll use it in next step when setting up GitHub Actions workflow.
This API key will also be automatically attached to running Backend app as STRIPE_API_KEY environment variable. This will enable us to consume webhook events and perform our specific business operations.
Less permissions variant
Optionally, you can pick specific scope permissions just for this token, so you won't use full access token. This is more secure approach.
On the same page as above (API Keys), you have to click Create restricted key, you'll be redirected to API Key creator form. There you'll have to specify whatever access you'll need.
Permissions that are needed by runtyme-kit to perform:
All core resources
    Products - Write
    Shipping rates - Write

All billing resources
    Coupons - Write
    Promotion Codes - Write
    Customer portal - Write
    Prices - Write
    Tax Rates - Write
    Meters - Write
    Meter Events - Write
    Meter Event Adjustments - Write

All webhook resources
    Webhook Endpoints - Write
Keep in mind that this will also be attached to your running application, so whatever permissions are needed for your app you need to specify them as well.
GitHub Actions
Your CI/CD runner will use Stripe API Key as secured secret environment variable to orchestrate Stripe changes.
- Go to your repository's Settings tab, under
SecurityclickSecrets and variables->Actions - Click
New repository secret, name itTF_VAR_STRIPE_API_KEYand paste the API Key you've copied in previous step.
Configure __env.tf
Here, you'll be able to configure Billing Portal, Webhooks and Products.
To make use of it, first you'll need to change stripe.enabled flag to true in your infra/__env.tf file.
locals {
    ...
    stripe = {
        enabled = true
    }
    ...
}
Billing
By default, your customers will use Stripe hosted Billing Portal to make payments, configure their accounts and manage their subscriptions.
runtyme-kit does not support custom implementations of Billing Portal equivalents, you can modify the source code yourself though.
Automated
Not everything about Billing Portal could be automated, some features are restricted to Stripe's dashboard only.
What you can configure automatically is:
- Headline
- Privacy Policy and Terms of Service URLs
- Return URL to which customers will be redirect on return
Reference
locals {
    ...
    stripe = {
        enabled = true
        billing = {
            # (optional) The messaging shown to customers in the portal.
            headline = "Runtyme.co"
            # (required) A link to the business's publicly available privacy policy.
            privacy_policy_url = "https://runtyme.co/privacy-policy"
            # (required) A link to the business's publicly available terms of service.
            terms_of_service_url = "https://runtyme.co/terms-of-service"
            # (optional) The default URL to redirect customers to when they click on the portal’s link to return to your website.
            # This can be overriden when creating the session.
            return_url = "https://runtyme.co/"
        }
    }
    ...
}
Manual
All the other features of Billing Portal can be configured here:
- Dashboard -> Settings -> Billing
- Dashboard -> Settings -> Business -> Branding
- It is necessary to activate Billing Portal manually:
- Dashboard -> Settings -> Billing -> Customer Portal -> Activate link
- The link you'll see should be added as environment variable called
STRIPE_BILLING_PORTAL_URLusingInfrastructure/Backend Instance/Custom configuration variablesguide
Webhooks
In order to integrate your backend with Stripe, we'll need to specify webhook endpoint on which Stripe will send customer (and else) events, so we can process them on our side.
Stripe will send us securely signed events, which we'll have to verify using Stripe's Signing Secret. This value is automatically attached to our Backend Application when deployed using runtyme-kit. The environment variable is called STRIPE_SIGNING_SECRET and will be attached together with STRIPE_API_KEY.
To test your webhook locally, follow this guide
To enable webhook, you need to change stripe.webhook.enabled flag to true, specify destination using stripe.webhook.url field and pick events that are needed for your implementation using stripe.webhook.enabled_events field array. Available Stripe events can be found here. Optionally, you can also specify stripe.webhook.version to hardcode the contract version of Stripe events. Available values can be found in your Stripe Dashboard's Overview.
Make sure stripe.enabled is set to true, otherwise webhook changes won't be applied.
Reference
locals {
    ...
    stripe = {
        enabled = true
        webhook = {
            // NOTE: if stripe.enabled=false this will be automatically disabled
            enabled = false
            // (required) URL on which Stripe will send events using POST method
            // standard value is: 'https://[domain.sub.api].[domain.root]/v1/webhooks/stripe/events'
            // Leaving it here as a plain value for easy customization
            url = "https://api.runtyme.co/v1/webhooks/stripe/events"
            // (optional) Stripe's API version
            version = "2024-06-20"
            // (optional) List of enabled events that will be sent to the webhook
            // default value is empty, use '[*]' if you want to enable all of them
            // list of available events: https://docs.stripe.com/api/events/types
            enabled_events = [
                "customer.created",
                "customer.subscription.created",
                "customer.subscription.deleted",
                "customer.subscription.updated"
            ]
        }
    }
    ...
}
Products
Another powerful feature of runtyme-kit's Stripe module is that it allows you to create and configure products.
What you can do?
- Create subscription based product or one-off payment products.
- Toggle visibility of products in Billing Portal
- Configure marketing features of those products, so customers know what they'll receive
products section of Stripe module is an array of objects, it is required that product has those fields populated:
name- The product’s name, meant to be displayable to the customer.system_key- Key which will be used to identify products and prices on our Backend API.price_currency- Three-letter ISO currency code, in lowercase - Stripe - Currenciesprice_amount_in_cents- A positive integer in cents (or 0 for a free price) representing how much to charge.
Reference
locals {
    ...
    stripe = {
        enabled = true
        products = [
            {
                // (required) The product’s name, meant to be displayable to the customer.
                // Whenever this product is sold via a subscription, name will show up on associated invoice line item descriptions
                name = "Standard"
                // (optional) The product’s description, meant to be displayable to the customer.
                // Use this field to optionally store a long form explanation of the product being sold for your own rendering purposes.
                description = "Standard version of the product"
                // (optional) A tax code ID. Supported values are listed in the TaxCode resource and at https://stripe.com/docs/tax/tax-categories.
                tax_code = "txcd_10000000"
                // (required) Key which will be used to identify products and prices on our Backend API
                system_key = "subscription_standard"
                // (optional) A list of up to 15 marketing features for this product. These are displayed in pricing tables.
                marketing_features = [
                "Access to elite community",
                "Lifetime updates"
                ]
                // (required) Three-letter ISO currency code, in lowercase - https://stripe.com/docs/currencies
                price_currency = "usd"
                // (required) A positive integer in cents (or 0 for a free price) representing how much to charge.
                price_amount_in_cents = 990
                // (optional) Essentially marking the product as a subscription, default: false
                // If false, it means this product can be bought with one-time payment
                recurring = true
                // (optional) Specifies billing frequency. Either 'day', 'week', 'month' or 'year'.
                // default: 'month'
                recurring_interval = "month"
                // (optional) Specifies whether to show this product during subscription updates in Stripe portal
                // default: true
                //    NOTE: AT LEAST ONE PRODUCT HAS TO BE VISIBLE
                show_in_portal = true
            },
            {
                name                  = "Paused"
                description           = "Paused subscription"
                system_key            = "subscription_paused"
                price_currency        = "usd"
                price_amount_in_cents = 100
                recurring             = true
                recurring_interval    = "month"
            },
            {
                name                  = "One-off"
                description           = "One-off payment"
                system_key            = "one_off"
                price_currency        = "usd"
                price_amount_in_cents = 100
            }
        ]
    }
    ...
}
Coupons
You are also able to define coupons, that could be applied on your product's price, giving your customers discount.
It's a powerful feature, enabling you to create marketing campains and possibly increasing conversion rate to your product.
runtyme-kit combines Stripe's coupons and promotion codes into single coupon entity.
What you can do:
- Specify multiple coupons as
stripe.couponsis of typelist - Decide whether the coupon is active by setting
activeflag to whethertrueorfalse - Specify display name of the coupon by setting
display_namevalue, this will be seen by your customers - Specify promotion code by setting
codevalue, this will be used by your customers when applying discount - Decide whether to apply percentage discount (
percentage_off) or fixed amount discount (amount_off_in_centsandcurrency) - Decide if applied coupon should be used only for first time payment (
apply_to_all_charges=false) for subscription or should be applied to all charges (apply_to_all_charges=true) - Specify when the coupon should expire by setting the
ends_atvalue with string timestamp of RFC3339 standard. Example:2025-12-31T23:59:59+00:00 - Specify for which products coupon is valid (if not specifed, it's valid for all) by using
for_productsfield list.for_productsfield accepts list ofsystem_keyspecified instripe.products[*].system_key- if given
system_keyis not present instripe.products[*].system_key, this value will be omitted
- Decide if the coupon is valid only for new customers by setting the
redeem_options.first_time_onlyflag totrue - Specify minimum value of payment for which the coupon is valid by setting
redeem_options.minimum_amount_in_centsandredeem_options.minimum_amount_currencyfields
Reference
locals {
    ...
    stripe = {
        enabled = true
        coupons = [
            {
                // (optional) Flag indicating whether the coupon is active, switch it to 'false' if you want to disable this coupon
                // default: 'true'
                active = true
                // (required) Human readable name of the coupon that is displayed to customers on, for instance invoices, or receipts.
                // NOTE: must be at most 40 characters long.
                display_name = "30% off"
                // (required) The customer-facing code. Regardless of case, this code must be unique across all active promotion codes for each customer.
                // Valid characters are lower case letters (a-z), upper case letters (A-Z), and digits (0-9).
                code = "MINUS30PERCENT"
                // (optional) Percent that will be taken off the subtotal of any invoices for this customer for the duration of the coupon.
                // For example, a coupon with 'percentage_off' of 50 will make a $100 invoice $50 instead.
                percentage_off = 30
                // (optional) Only valid for subscription products
                // if true - Applies to all charges from a subscription with this coupon applied.
                // if false - Applies to the first charge from a subscription with this coupon applied.
                apply_to_all_charges = false
                // (optional) Date after which the coupon can no longer be redeemed.
                // RFC3339
                ends_at = "2025-12-31T23:59:59+00:00"
                // (optional) Settings that restrict the redemption of the coupon.
                redeem_options = {
                    // (optional) A Boolean indicating if the coupon should only be redeemed for Customers without any successful payments or invoices
                    first_time_only = true
                }
                // (optional) List of product system_keys this coupon applies to.
                // 'system_key' is the value specified in 'stripe.products[*].system_key' field.
                // If value specified here is not defined in 'stripe.products' list, the value will be skipped.
                for_products = ["subscription_standard"]
            },
            {
                active       = true
                display_name = "50 USD off"
                code         = "MINUS50USD"
                // (optional) Amount (in the 'currency' specified) that will be taken off the subtotal of any invoices for this customer.
                amount_off_in_cents = 5000
                // (optional) If 'amount_off_in_cents' has been set, the three-letter ISO code for the currency of the amount to take off.
                // https://stripe.com/docs/currencies
                currency             = "usd"
                apply_to_all_charges = false
                // (optional) Maximum number of times this coupon can be redeemed, in total, across all customers, before it is no longer valid.
                max_redemptions = 10
                ends_at         = "2025-12-31T23:59:59+00:00"
                // (optional) Settings that restrict the redemption of the coupon.
                redeem_options = {
                    // (optional) Minimum amount required to redeem this coupon (e.g., a purchase must be $100 or more to work).
                    minimum_amount_in_cents = 2000
                    // (optional) (required if 'redeem_options.minimum_amount_in_cents' is set)
                    // Three-letter ISO currency code for 'redeem_options.minimum_amount_in_cents', in lowercase - https://stripe.com/docs/currencies
                    minimum_amount_currency = "usd"
                }
            }
        ]
    }
    ...
}