Netlify
Get started
If it comes to Web applications, you'd most certainly need some UI exposed on the internet. Fortunatelly, runtyme-kit has Netlify support, which allows you to deploy your UI, Documentation sites and other pages.
Having more than 2 sites simulatously ran in Netlify, manual change of runtyme-kit source code is required.
How to get Access Token?
First of all, you need to have Netlify account created, when you have it, log into Netlify dashboard.
Then find your user's settings page, there you'll see applications section inside nested sidebar.
In this section, you'll see Personal access tokens block with New access token button, tap this button.

You'll see token creator.
Name your access token descriptively, select time to expire that suits you and proceed with clicking Generate token button.
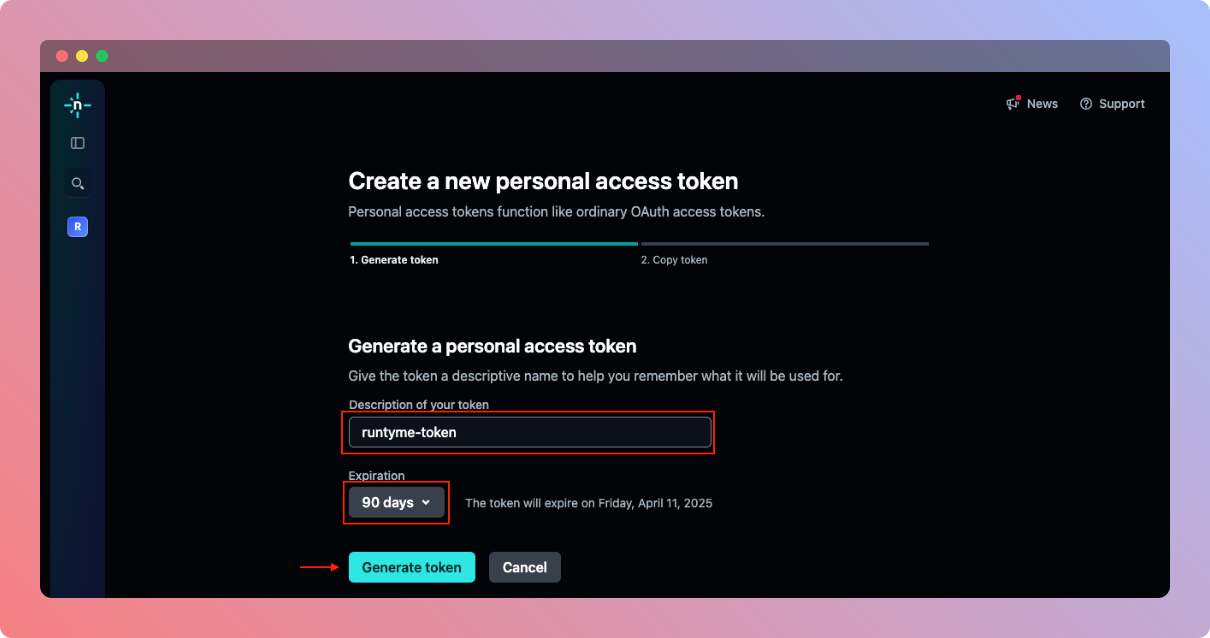
After clicking Generate token button, you'll see your created token, make sure you save it in safe place, you'll never see it again.
Integrate with GitHub Actions
To use Netlify with runtyme-kit automated way, we'll have to add specific secret values in your project's GitHub repository, so GitHub Actions runner can pick them up and perform infrastructure updates on those specific resources.
To add secrets to your GitHub repository, go to repository's Settings->Secrets and variables->Actions, under Secrets tab, click New repository secret button.
Following secrets must be added:
TF_VAR_NETLIFY_ACCESS_TOKEN- Use value fromHow to get Access Token?step.
How to create a site (Connect to GitHub)
There are 3 steps to make your website automatically deployed from repository. First you have to connect Netlify to your GitHub (can be anything else) account, then authorize Netlify for your repository and finally create a site deployment.
Repeat this step everytime you want to add new site, after doing it the first time it might be slightly different, but the concept stays the same.
If you don't have GitHub Connected
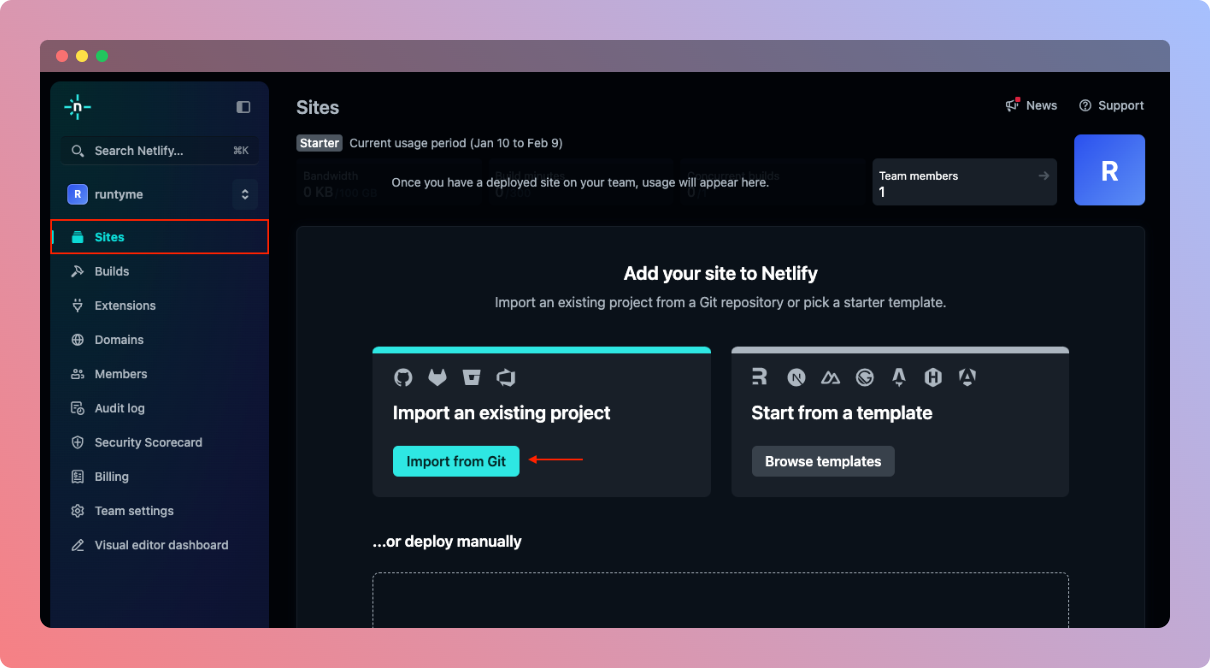
Navigate to Netlify's dashboard, choose your team and navigate to Sites on sidebar.
If you're not connected to any Git provider you should see Import from Git button inside Import an existing project block section. Click it.
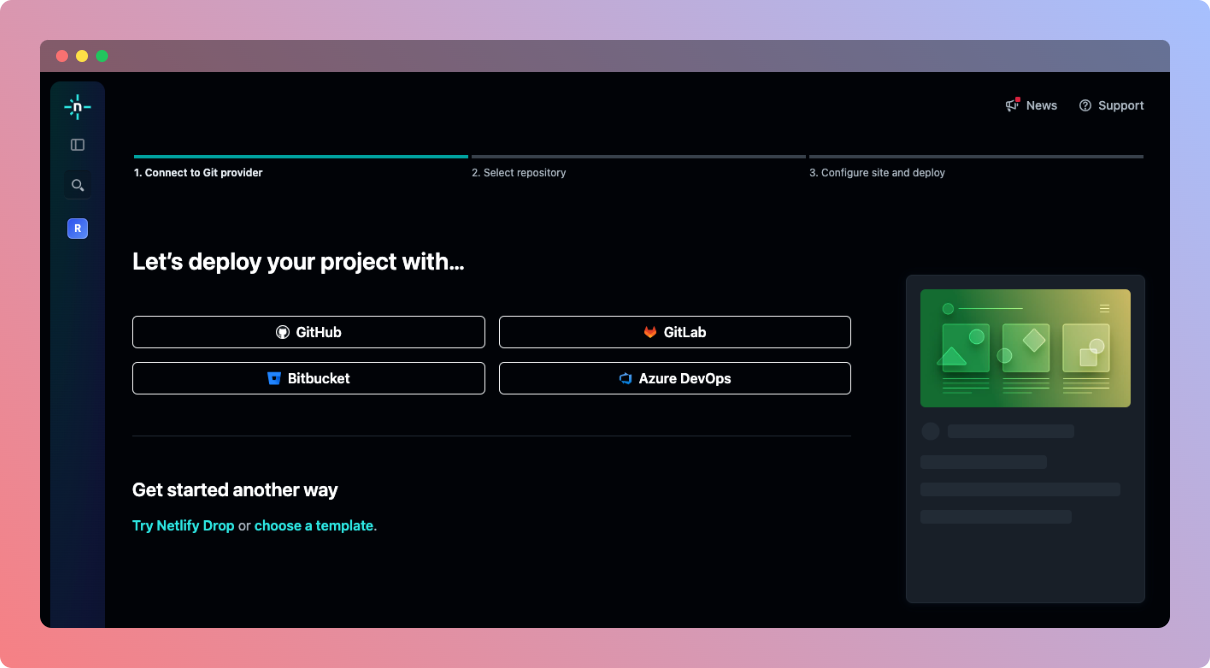
After clicking the button you'll be prompted to choose a provider. Choose GitHub and proceed to the next step.
In this guide we'll be using GitHub, but you're free to choose any other provider. Just keep in mind that in this guide we'll only cover GitHub connection.
When picked, you'll be redirected to GitHub auth page asking you to authorize Netlify to access your GitHub account's resources. Click Authorize Netlify button and proceed to the next step.

Done, Netlify is now connected to your account.
If you don't have GitHub configured
During site creation, after your connected your Netlify account to your GitHub account, Netlify will ask you to choose a repository which you want to deploy.
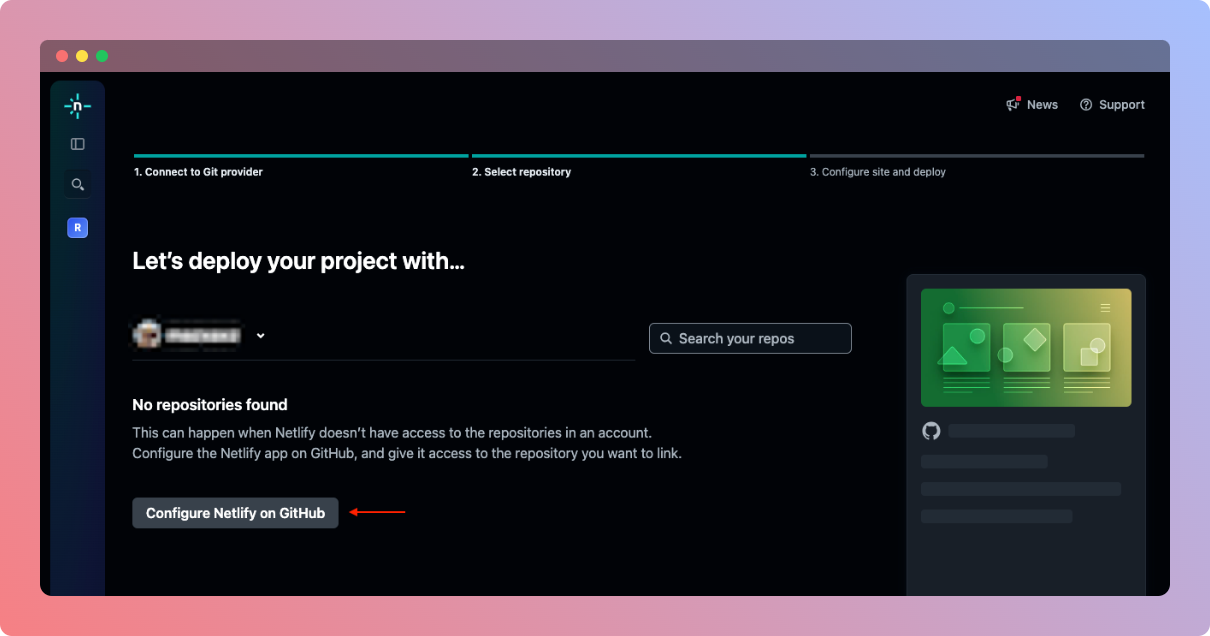
If you don't see any repositories listed, there's a chance that you need to authorize Netlify to have access to some (can be all if you want) of your repositories.
In order to authorize it, click Configure Netlify on GitHub button seen during Select repository step.
Once again, you'll be redirected to GitHub auth page asking you where you want to install Netlify. Pick whatever suits you.
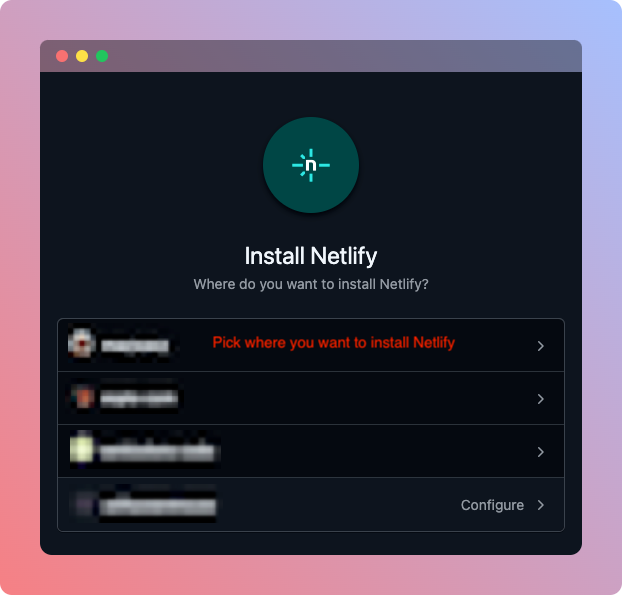
When picked, you can either give Netlify permissions to all your repositories by selecting All repositories option, or specify repositories manually by selecting Only select repositories option.
If you selected Only select repositories option, you need to select your repositories and then click Install button. If you selected All repositories, feel free to click Install button right away.
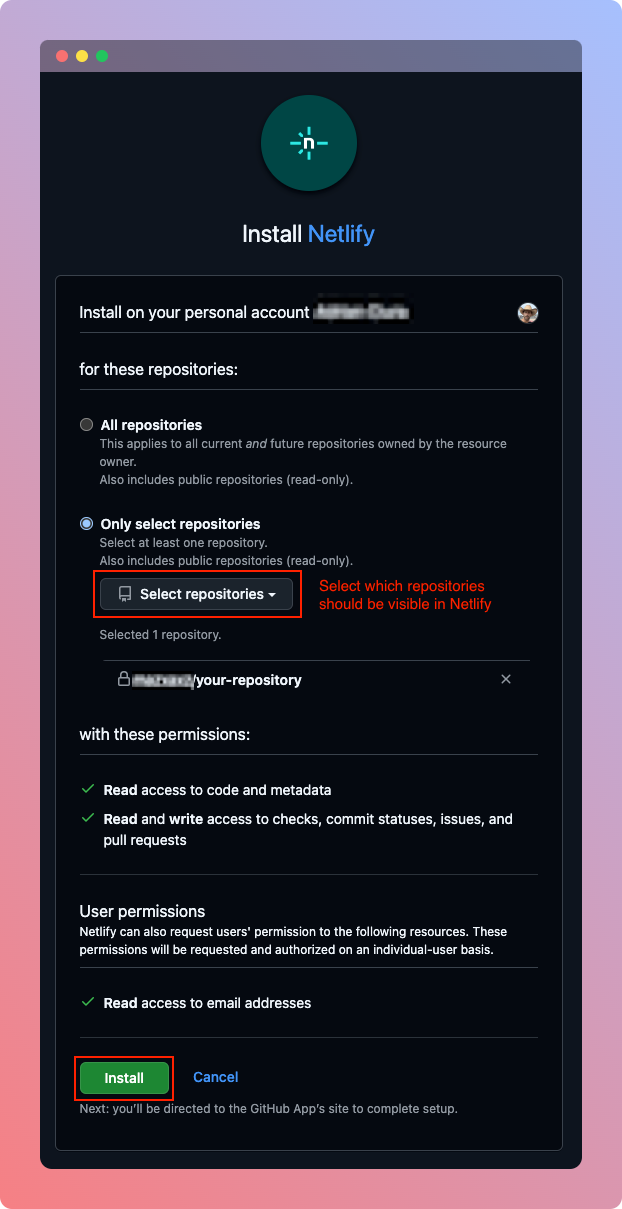
After clicking Install button, you'll be redirected back to Netlify site creator page, for further instructions see next step (Deployment).
Deployment
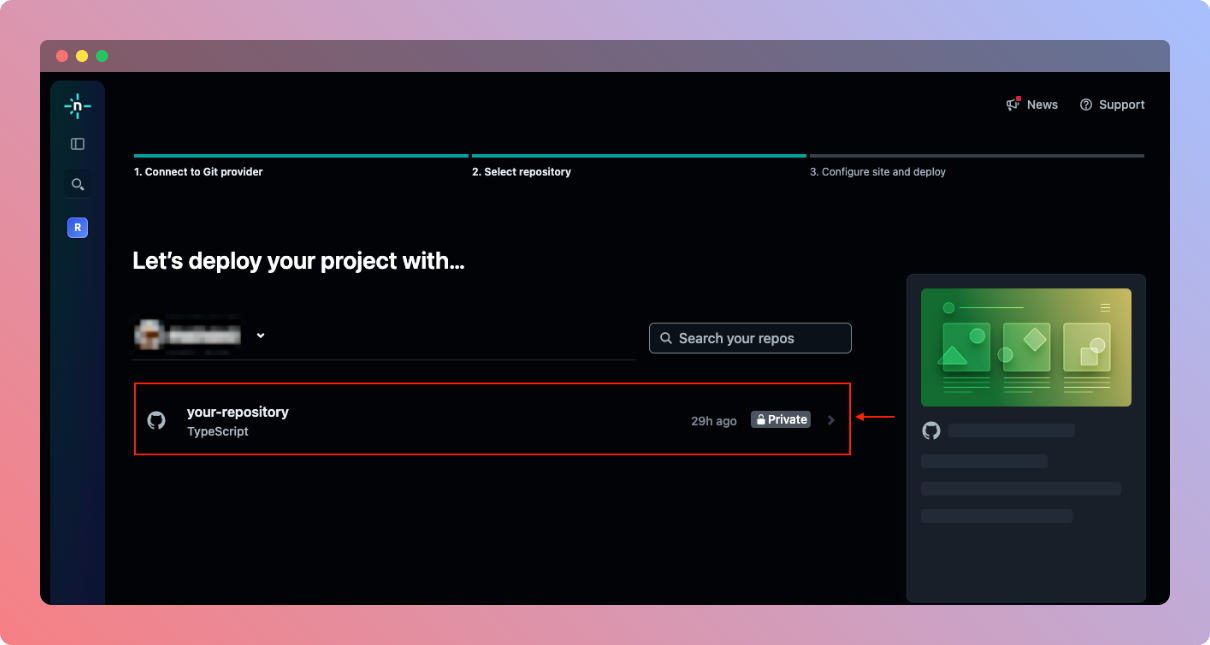
To finish creating your site and deploy your frontend app on Netlify, during creation step, you'll see list of all repositories Netlify has access to.
Pick the one you want to deploy and proceed to the next step.
You should see big and long form that is half populated, right now we only care about Site name, populate it however you want (optionally, you can also look at other fields).
Click Deploy <site_name> button.
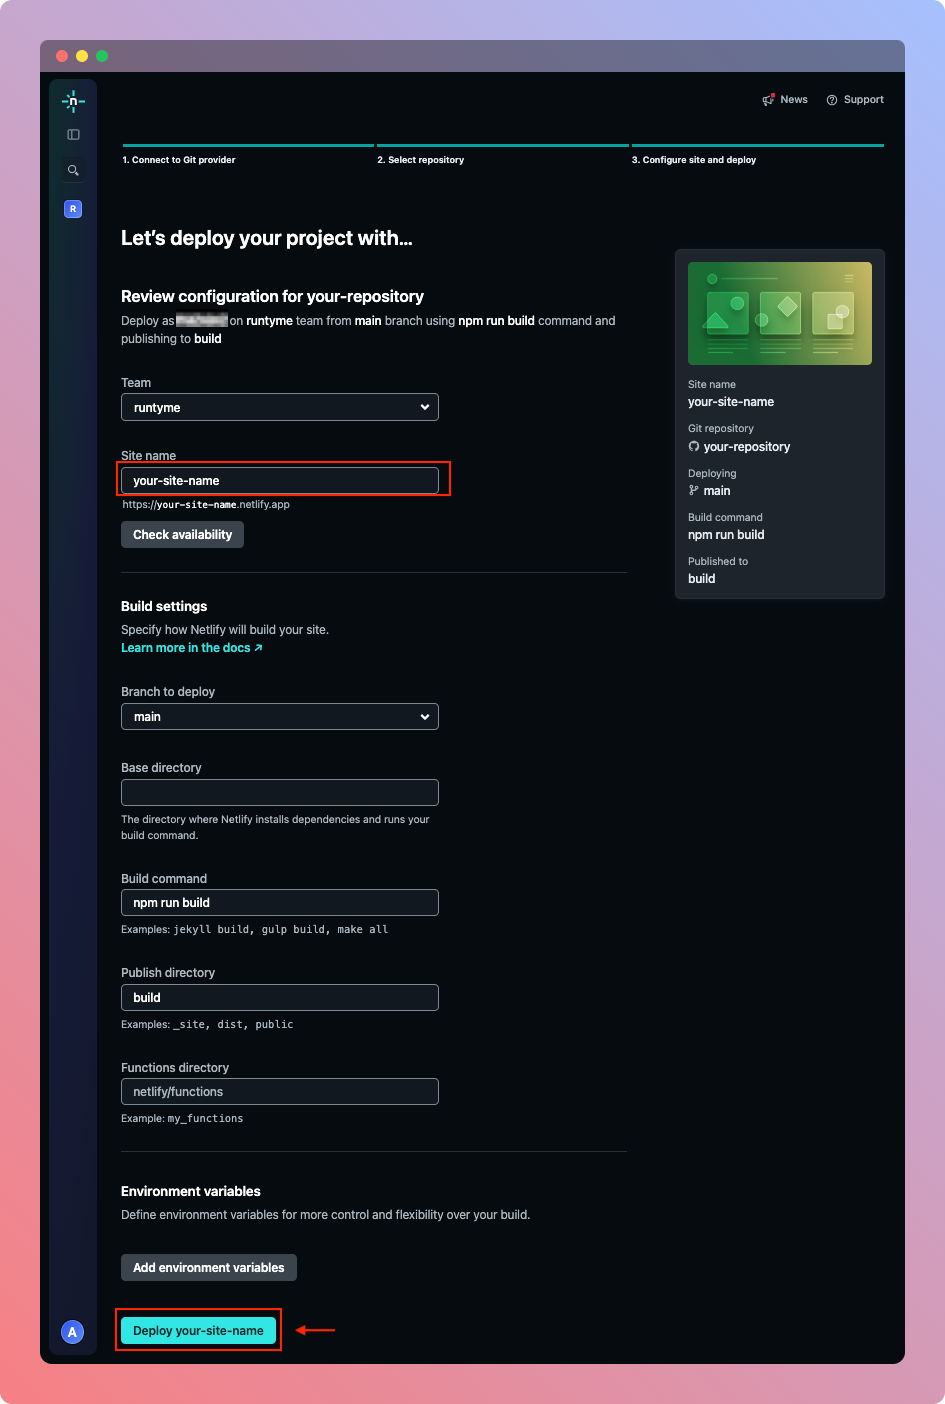
If everything goes well, your app should be available under https://<site_name>.netlify.app/.
In this guide we were populating build field with default values provided by Netlify, those values might not be applicable to your case. There's a chance you'll see some errors.
If it comes to URL of your deployed app, runtyme-kit automatically sets up DNS records (if gateway enabled and domain values populated), so it'll be accessible under https://<domain.sub.ui/docs>.<domain.root> (i.e. https://docs.example.com) as well.
Configuring __env.tf file
To enable Netlify segment you have to switch netlify.enabled flag to true and populate netlify.team_name value with your Netlify's team name slug.
locals {
    ...
    netlify = {
        enabled   = true
        team_name = "runtyme"
    }
    ...
}
By default runtyme-kit gives you 2 sites you can use to configure and setup. Those segments are UI and Docs, you'll learn about them in next steps.
If you want to add custom segments, it'll be worth looking at infra/ui.tf and infra/gateway.tf files. First one is responsible for configuration of those segments and the second one is for DNS setup, so you can access your apps under your domain name.
Both segments are optional, so you don't need to have them at all or just use one. For example, you don't need docs as separated part of your application, so you can just use ui block and remove docs from __env.tf.
UI
This segment is linked to domain.sub.ui field and it's meant to be your entrypoint point of the application. It means that if domain segment populated, your app DNS will be automatically set up for your application to be accessible under https://<domain.sub.ui>.<domain.root>.
If you use @ value as domain.sub.ui, your app will be accessible on
https://<domain.root>https://www.<domain.root>.
You'd want to use it for landing pages, SPAs etc.
Block reference:
locals {
    ...
    netlify = {
        enabled = true
        // (required) Value of your Netlify's team name slug
        team_name = "runtyme"

        // (optional) If enabled, this will point to `domain.sub.ui` value and
        // `domain.sub.ui`.`domain.root` will be used as access URL of this app
        ui = {
            // if disabled, all below values can be empty
            enabled = false
            // (required) Name of your Netlify's Site you want to configure here
            name = "ui-runtyme"
            // (required) Command that will be used to build your site on Netlify in order to deploy it
            command = "npm run build"
            // (required) Directory name of static files that are meant to be hosted, generated by `ui.command`
            directory = "build"
            // (required) Branch name of your UI Application repository that will be used by Netlify to build and deploy an instance of it
            branch = "main"
            // (optional) Enables Netlify's analytics feature for this site, default: false
            // NOTE: Available only for non-free tiers, >Starter
            analytics = false
            // (optional) Enables real user performance monitoring, default: false
            // NOTE: available only for non-free tiers, >Pro
            user_metrics = false
        }
    }
    ...
}
Docs
This segment is linked to domain.sub.docs field and it's meant to be your project's documentation webpage. It means that if domain segment populated, your app DNS will be automatically set up for your application to be accessible under https://<domain.sub.docs>.<domain.root>.
If you use @ value as domain.sub.docs, your app will be accessible on
https://<domain.root>https://www.<domain.root>.
Block reference:
locals {
    ...
    netlify = {
        enabled = true
        // (required) Value of your Netlify's team name slug
        team_name = "runtyme"

        // (optional) If enabled, this will point to `domain.sub.docs` value and
        // `domain.sub.docs`.`domain.root` will be used as access URL of this app
        docs = {
            // if disabled, all below values can be empty
            enabled = true
            // (required) Name of your Netlify's Site you want to configure here
            name = "docs-runtyme"
            // (required) Command that will be used to build your site on Netlify in order to deploy it
            command = "npm run build"
            // (required) Directory name of static files that are meant to be hosted, generated by `ui.command`
            directory = "build"
            // (required) Branch name of your UI Application repository that will be used by Netlify to build and deploy an instance of it
            branch = "main"
            // (optional) Enables Netlify's analytics feature for this site, default: false
            // NOTE: Available only for non-free tiers, >Starter
            analytics = false
            // (optional) Enables real user performance monitoring, default: false
            // NOTE: available only for non-free tiers, >Pro
            user_metrics = false
        }
    }
    ...
}
Reference
locals {
    ...
    netlify = {
        enabled = true
        // (required) Value of your Netlify's team name slug
        team_name = "runtyme"

        // (optional) If enabled, this will point to `domain.sub.ui` value and
        // `domain.sub.ui`.`domain.root` will be used as access URL of this app
        ui = {
            // if disabled, all below values can be empty
            enabled = false
            // (required) Name of your Netlify's Site you want to configure here
            name = "ui-runtyme"
            // (required) Command that will be used to build your site on Netlify in order to deploy it
            command = "npm run build"
            // (required) Directory name of static files that are meant to be hosted, generated by `ui.command`
            directory = "build"
            // (required) Branch name of your UI Application repository that will be used by Netlify to build and deploy an instance of it
            branch = "main"
            // (optional) Enables Netlify's analytics feature for this site, default: false
            // NOTE: Available only for non-free tiers, >Starter
            analytics = false
            // (optional) Enables real user performance monitoring, default: false
            // NOTE: available only for non-free tiers, >Pro
            user_metrics = false
        }

        // (optional) If enabled, this will point to `domain.sub.docs` value and
        // `domain.sub.docs`.`domain.root` will be used as access URL of this app
        docs = {
            // if disabled, all below values can be empty
            enabled = true
            // (required) Name of your Netlify's Site you want to configure here
            name = "docs-runtyme"
            // (required) Command that will be used to build your site on Netlify in order to deploy it
            command = "npm run build"
            // (required) Directory name of static files that are meant to be hosted, generated by `ui.command`
            directory = "build"
            // (required) Branch name of your UI Application repository that will be used by Netlify to build and deploy an instance of it
            branch = "main"
            // (optional) Enables Netlify's analytics feature for this site, default: false
            // NOTE: Available only for non-free tiers, >Starter
            analytics = false
            // (optional) Enables real user performance monitoring, default: false
            // NOTE: available only for non-free tiers, >Pro
            user_metrics = false
        }
    }
    ...
}