SendGrid Free
Due to Terraform limitations, any changes around this module are AUTOMATICALLY APPLIED ON EVERY PUSH to the repository.
In this guide you'll learn how to enable and automatically configure SendGrid platform, so your service and dependencies can safely send emails to your customers.
First of all, it is necessary to create SendGrid account, you can do this using this link. It'll point you to Twillio's sign-up/login page. Twillio owns SendGrid, so that's why it's Twilio and not SendGrid.
Get Started
It is almost always necessary to have you own custom SMTP server for any email related operations. Anyone that is willing to send emails for you, almost always require custom SMTP. Which makes absolute sense from security perspective. No one wants their email reputation being disturbed by malicious individials.
That's why, using runtyme-kit, you can easily configure a custom SMTP server and use it automatially across external resources that need it.
Before proceeding with Email sending configuration, it is necessary to own a Domain with configured Gateway and DNS, see Gateway section.
How to get API Key
-
Log into SendGrid dashboard
-
Find
API Keystab underSettingssection on left side bar and clickCreate API Key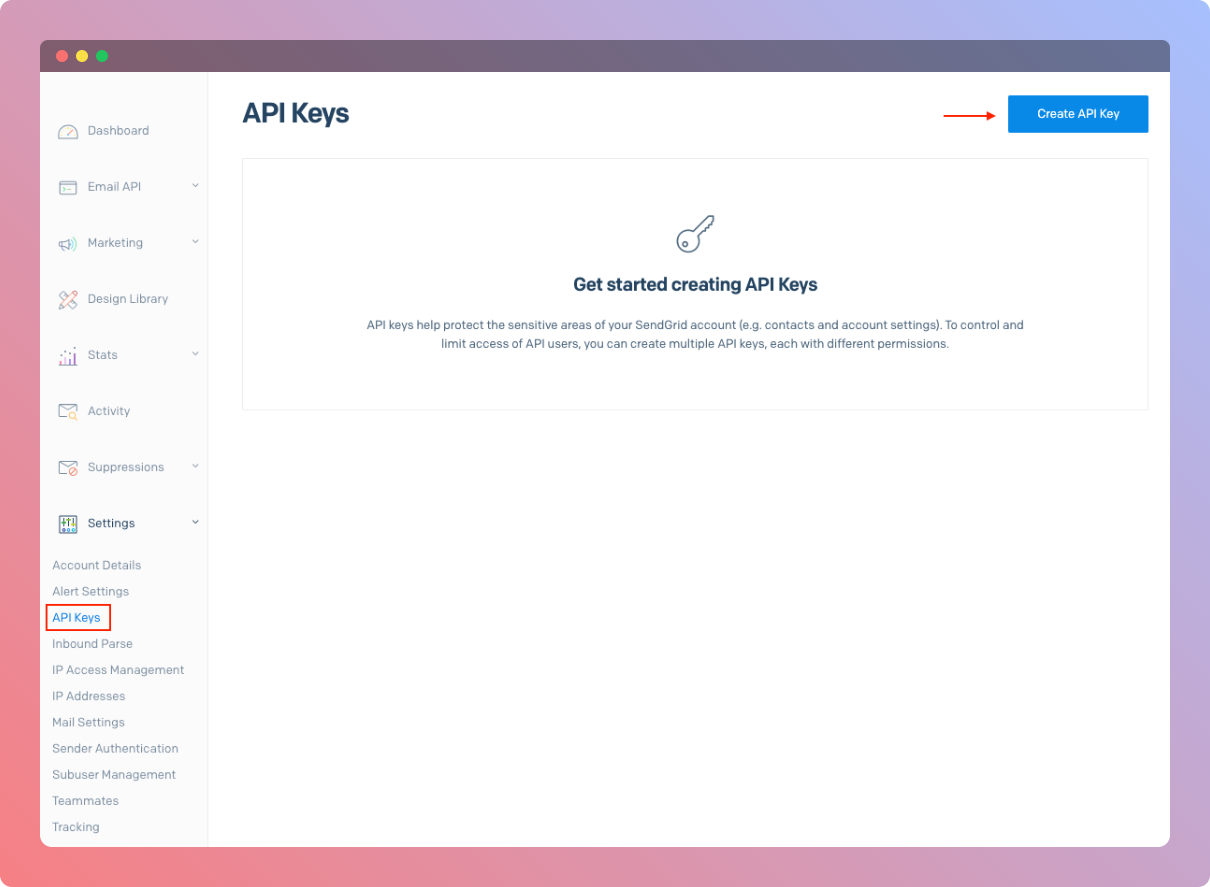
-
Name your API Key with a value that is descriptive to you, give it
Full Accessand proceed with clickingCreate & Viewbutton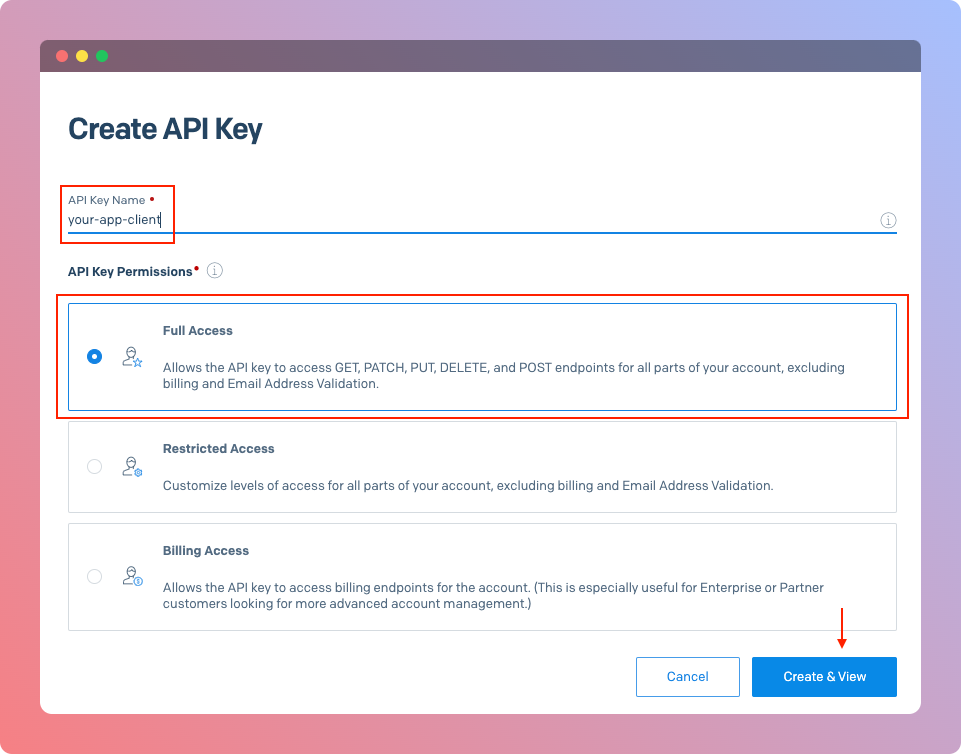
-
You'll be prompted with created API Key value, make sure to save it in a safe place
Be aware that this API Key will also be attached to your backend application as environment variable, so that's why it is specified to give it Full Access
Integrate with GitHub Actions
To use SendGrid with runtyme-kit automated way, we'll have to add specific secret values in your project's GitHub repository, so GitHub Actions runner can pick them up and perform infrastructure updates on those specific resources.
To add secrets to your GitHub repository, go to repository's Settings->Secrets and variables->Actions, under Secrets tab, click New repository secret button.
Following secrets must be added:
TF_VAR_SENDGRID_API_KEY- Use value fromHow to get API Keystep.
Enable __env.tf
To enable SendGrid in __env.tf file you need to switch sendgrid.enabled flag to true and populate sendgrid.sender_email and sendgrid.sender_name. The last two are being used for Supabase SMTP configuration, as well as for populating environment variables inside your Backend app, so your service know what values to use when sending emails through SDK.
Templates
Powerful feature of runtyme-kit is that it gives you opportunity to create dynamic email templates in SendGrid automatically. You specify name, subject and relative_path to HTML file template that resides somewhere under /infra directory.
Kit will automatically populate environment of running Backend app with template_id of created template, so you can use it when sending emails programatically.
template_id will be attach in this schema:
- environment variable name:
SENDGRID_TEMPLATE_ID_<name>, value:id - example:
name=foo=>id=111222333=>SENDGRID_TEMPLATE_ID_FOO=111222333
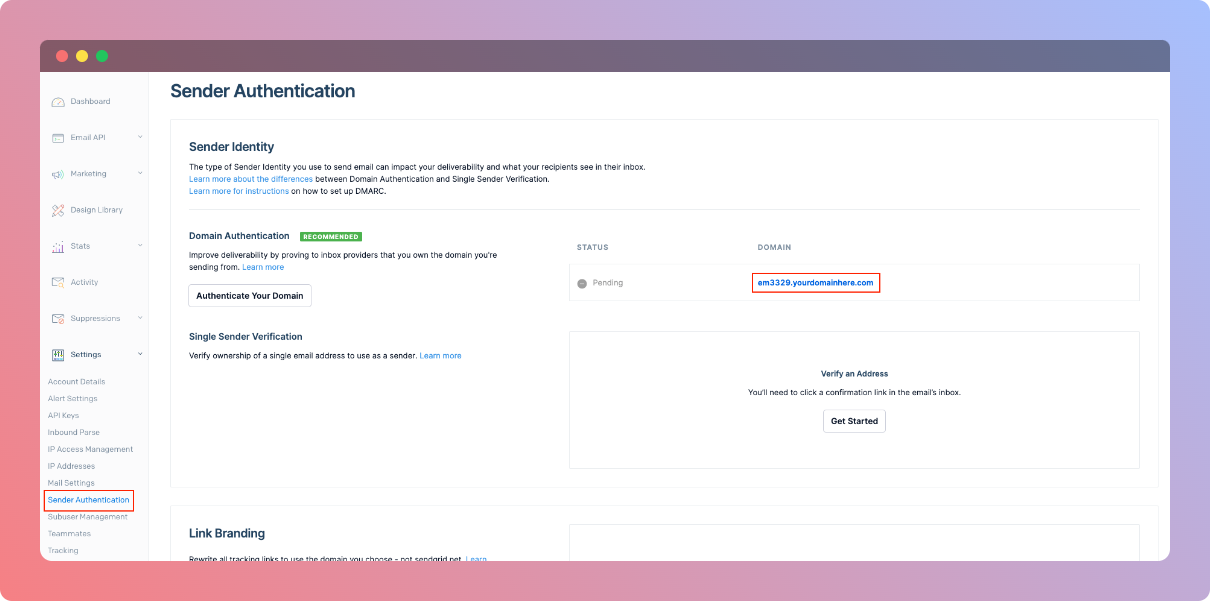
(important) Verify Domain (Manual)
After applying runtyme-kit's changes around SendGrid, you'll see your domain in a Pending state.
Unfortunatelly, it could not be automated, so we have to go to the dashboard and under Settings -> Sender Authentication select our domain that is in Pending state and click Verify button in top-right side of your screen.
Twillio's guide:
Disabling
If you're using Supabase, make sure to switch usage of custom SMTP server in your project's Supabase dashboard under Project Settings -> Authentication -> SMTP Settings, otherwise apply flow will fail. That's due to inconsistency of Supabase API and Terraform provider.
Troubleshooting
Error: failed parsing template: json: cannot unmarshal object into Go struct field TemplateVersion.versions.warnings of type string
Explaination: This happens whenever your template contains warnings and since SendGrid provider is not able to handle the response, your pipeline will fail.
Fix: Validate your templates agains SendGrid's dynamic template builder, fix your template accordingly and re-run the pipeline.
Reference
locals {
    ...
    sendgrid = {
        enabled = false
        // (required) This is the email address the emails will be sent from
        sender_email = "[email protected]"
        // (required) Name displayed in the recipient's inbox
        sender_name = "runtyme.co"

        templates = {
            "account_delete_requested" : {
                name          = "account_delete_requested"
                subject       = "[your_app] We've received your Account deletion request"
                relative_path = "/_templates/emails/account_delete_requested.html"
            }
        }
    }
    ...
}