Auth0 Free
Get Started
Auth0 is an identity provider that takes responsibility of full user authentication flow out from you. It also gives us a possibility to use already built-in sign-in/sign-up webpage, so you don't have to built those components on your own.
To get started make sure Terraform backend is already confiured (please refer to State management page).
Might be obvious, but make sure you have Auth0 account. If not you can to create it here.
All secrets and variables associated with Auth0 (i.e. JWT Issuer, Client ID, Client Secret), will be automatically attached to the running application (if heroku.enabled = true)
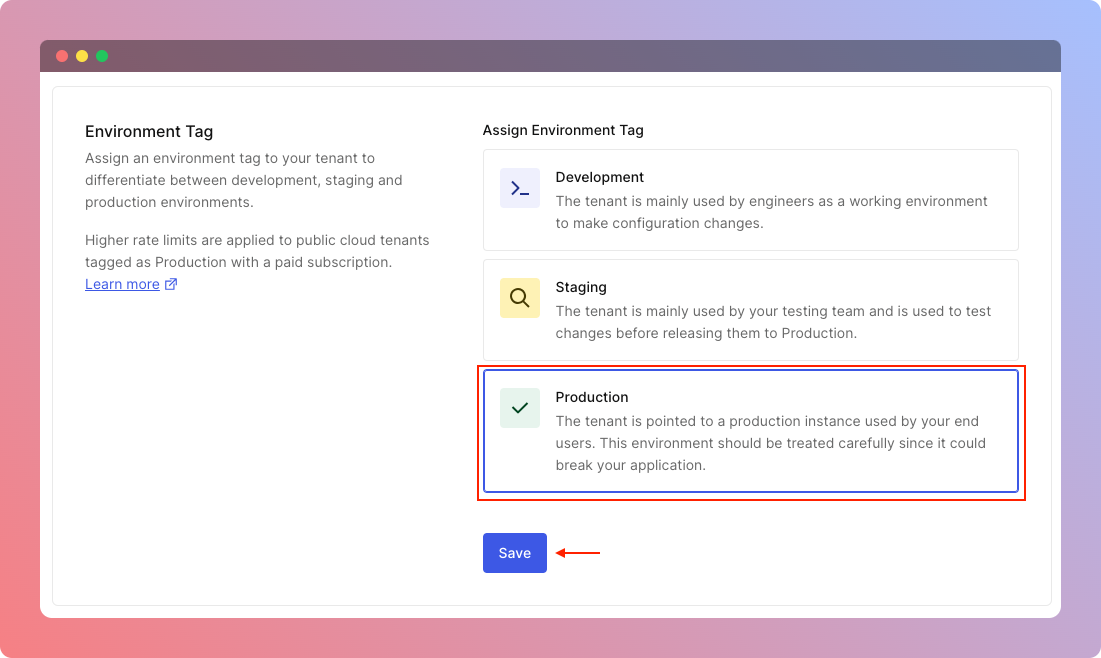
(Optional) Switching from Development to Production tag
Optionally, we would want to switch Auth0's project tag from Development to Production.
In order to do it we should navigate to Settings page, using left sidebar and look for Environment tag section.
There you simply pick Production and click Save button.
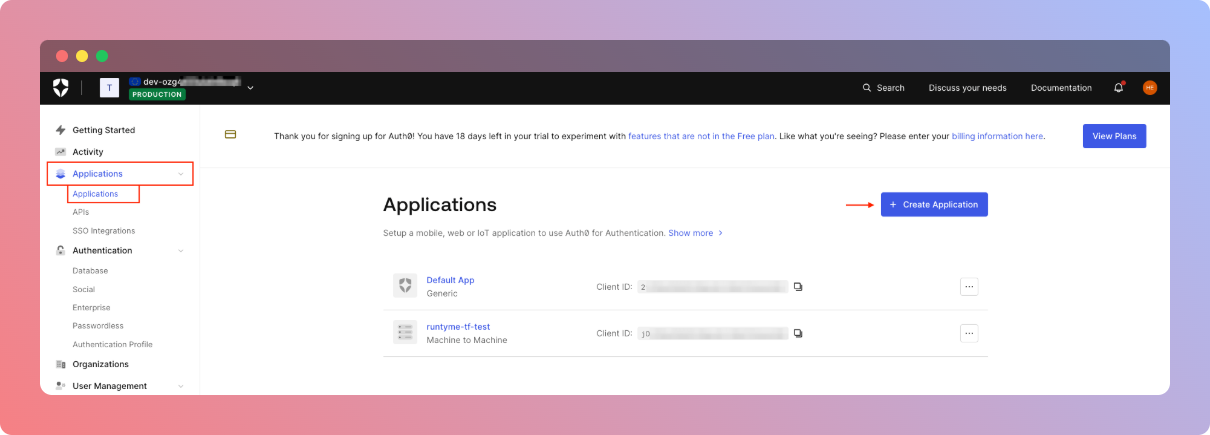
Create credentials for runtyme-kit
In this section we'll go through creation of Auth0 Client for our automated process. The credentials we're using here are purely for Terraform purposes only and should not be used in any executable applications (except domain name, which is per Tenant value).
First, we want to navigate to Applications page using left side bar. Then you should see Create Application button on top right of your screen. Click it.
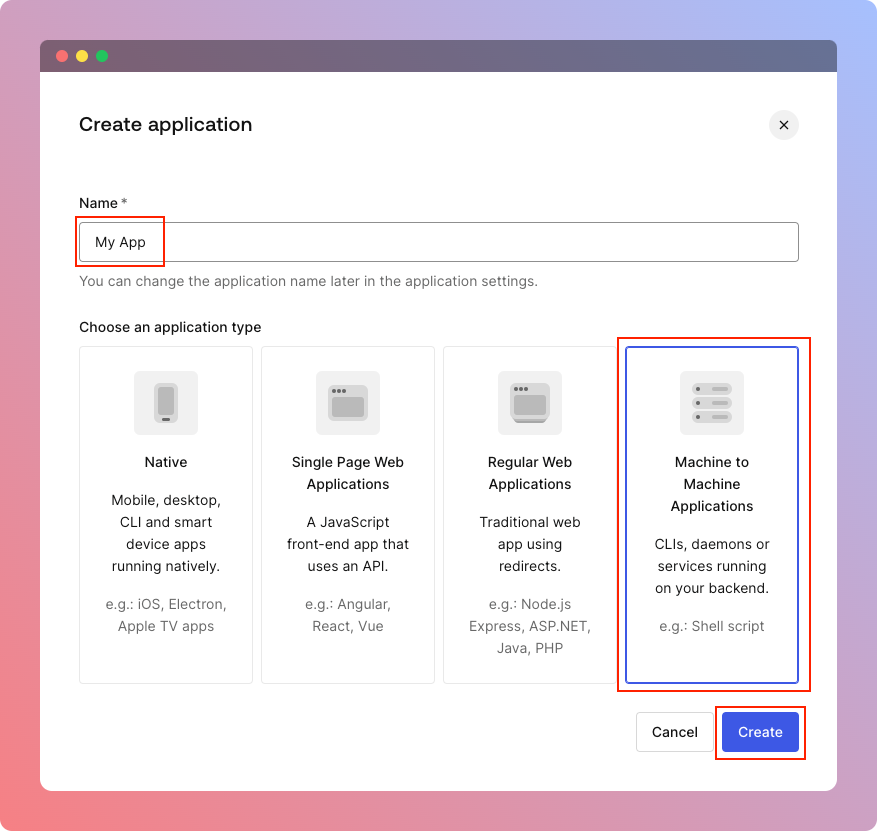
When clicked, you'll be prompted with a modal asking for name and type of the client. You can name it however you want, yet type of it must be Machine to Machine Applications. When you're done, just click Create button.
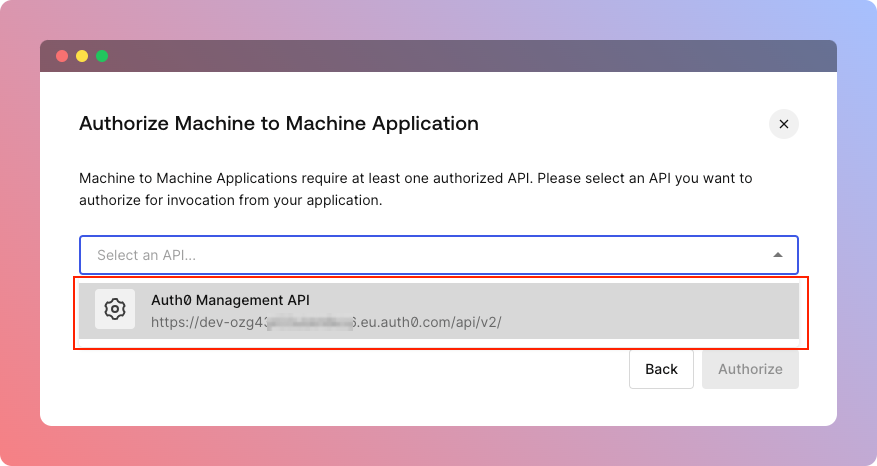
Then you'll be asked to pick an API on which this Application will perform operations. Simply pick Auth0 Management API if you don't have anything custom configured.
When API is picked, you need to specify authorization scopes for this Application, in this case for simplicity we want to click All.
Finally, you can click Authorize button and proceed to the next step.

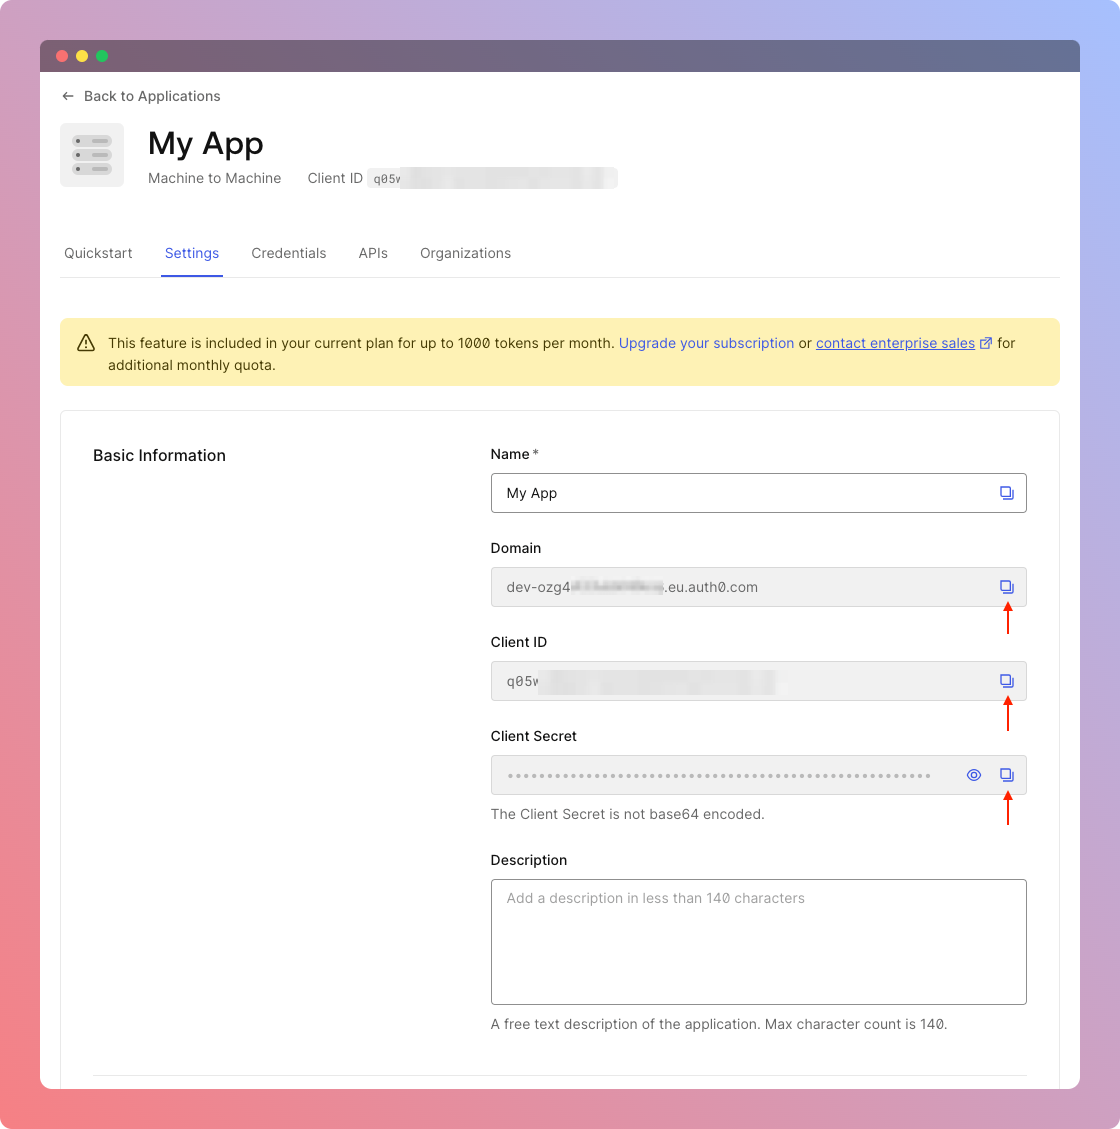
At the end, you'll see page with all necessary configuration and secrets variables that we'll need. You just need to copy them and use it in the next step of this guide.
GitHub Actions
Your CI/CD runner will use Auth0's Client ID and Client Secret as secured secrets environment variables and Auth0's Domain as environment variable to orchestrate Auth0 changes.
- Go to your repository's Settings tab, under
SecurityclickSecrets and variables->Actions - Click
New repository secret(Secrets tab), name itTF_VAR_AUTH0_CLIENT_IDand paste the Client ID you've created in previous step. - Click
New repository secret(Secrets tab), name itTF_VAR_AUTH0_CLIENT_SECRETand paste the Client Secret you've created in previous step. - Click
New repository variable(Variables tab), name itTF_VAR_AUTH0_DOMAINand paste the domain name from previous step.
Attached environment variables to your backend instance
AUTH0_CLIENT_ID- Client ID used for generating access token to management API, also anaudvalue of JWT access tokenAUTH0_CLIENT_SECRET- Secret used for generating access token to management API, also used for validating JWT access tokensAUTH0_DOMAIN- Domain name of your tenantAUTH0_JWT_ISSUER-issvalue of JWT access token, useful for validation
Configure Auth0 in __env.tf file
To enabled Auth0 module, just change auth0.enabled flag to true and specify your project name by setting auth0.project_name value.
You also should set auth0.site_url value, as this value will be used as base for links your customers will receive by emails.
auth0.after_logout_url value is for Auth0's purposes, so Auth0 know which URL is safe to redirect users into after they logout from system.
Disable signups
If needed, you can quickly disable signups by setting auth0.disable_signup to true. That way, customers won't be able to create an account on their own, the only way would be through invitation.
Using custom SMTP server
By default you can use Auth0's default SMTP provider with limited capabilities, although it is recommended to use your custom one.
There's a possibility to automatically attach SendGrid's client by setting auth0.smtp.use_sendgrid to true. Keep in mind, that sendgrid.enabled MUST be set to true as well, since runtyme-kit attaches values from this specific module.
Reference
locals {
    ...
    auth0 = {
        enabled = true
        // (required) Name of your project, it'll be visible on sign-in/sign-up page
        project_name = "Runtyme Kit"
        // (optional) By setting this to 'true' you forbid users to sign-up to your platform, this might be a case when
        // you'd want to have users created from Stripe flow, or users being invited
        // default: false
        disable_signup = false

        // (optional) This is the Site URL that will be used as base URL for a Magic Link
        // default: https://localhost:3000, no wildards (*) allowed
        site_url = "https://runtyme.co"
        // (optional) Tell Auth0 here that this URL is safe to redirect users to after they attempt log out
        after_logout_url = "https://runtyme.co/sign-in"

        // (optional) Specify custom SMTP server for Auth0 emails
        //    NOTE: If empty, default shared Auth0 server will be used, not recommended for production application
        smtp = {
            // (optional) If set to 'true' AND 'sendgrid.enabled=true', configured SendGrid SMTP server will be used
            // default: false
            use_sendgrid = false
        }
    }
    ...
}
Configuring Username+Password flow
To enable this flow, simply set auth0.password.enabled to true.
A go to auth flow is Username+Password by default, so even if auth0.otp.enabled is set to true together with auth0.password.enabled set to true, the Username+Password flow will be used to authenticate users.
It is possible to configure password policy of signing up users by auth0.password.policy and auth0.password.min_length fields.
auth0.password.policy- Auth0's password policy value, available values:none,low,fair,good,excellent(Auth0 docs)auth0.password.min_length- Minium length of password for new users, default:8, minium:1, maximum:128, recommended>8
locals {
    ...
    auth0 = {
        enabled      = true
        project_name = "Runtyme Kit"

        site_url         = "https://runtyme.co"
        after_logout_url = "https://runtyme.co/sign-in"

        // optional
        password = {
            enabled = true
            // (optional) Specific Auth0 password policy, available values: 'none', 'low', 'fair', 'good', 'excellent'
            policy = "good"
            // (optional) Passwords shorter than this value will be rejected as weak.
            // default: 8, Minimum 1, Maximum 128, recommended 8 or more.
            min_length = 8
        }
    }
    ...
}
Configuring OTP flow
Instead of Username+Password flow you can also use OTP (or Magic-Link) auth flow. To enable it you have to switch auth0.otp.enabled flag to true and disable password flow by setting auth0.password.enabled flag to false.
As a part of OTP configuration you can change expiration time of Magic-Link/OTP using auth0.otp.expire_in field. By default it's 3600 seconds (1h), minimum value is 60 seconds.
You can also specify the length of OTP code. By default it's 6, but the available range is between 4 and 40 characters long.
It is also important to configure and email template that will be used for sending Magic-Link/OTP. You can specify subject of this email using auth0.otp.email_subject field as well as email template using auth0.otp.email_template_relative_path field. This part is required, if left empty runtyme-kit will fail on validation.
locals {
    ...
    auth0 = {
        enabled      = true
        project_name = "Runtyme Kit"

        site_url         = "https://runtyme.co"
        after_logout_url = "https://runtyme.co/sign-in"

        // optional
        otp = {
            // IMPORTANT: To enable Passwordless flow in Auth0's Universal Login page, `auth0.password.enabled` must be set to false
            // otherwise Username + Password flow will be used by default
            enabled = true
            // (optional) Time after Magic Link will expire and will no longer be valid
            // default: 3600 - 1h, Minimum: 60
            expire_in = 3600
            // (optional) Number of generated characters for OTP auth
            // default: 6, Minimum: 4, Maximum: 40
            code_length = 6
            // (required) Subject of an email sent when passwordless flow is triggered
            email_subject = "[your_app] Your Magic Link"
            // (required) Contents of an email sent when passwordless flow is triggered
            email_template_relative_path = "/_templates/emails/auth0/otp.html"
        }
    }
    ...
}
Email templates
You can automatically specify and configure email templates for specific actions triggered by Auth0's flow.
By default, out of the box templates are under infra/_templates/emails/auth0 directory. You are free to modify them however you want. Here are the possible variable values you can use when working with Auth0 email templates.
To configure runtyme-kit to automatically attach your email templates you need to set auth0.enabled flag to true and specify auth0.email_templates block.
auth0.email_templates block is a map of template type being a key and an object of email subject and template_relative_path as value i.e.
email_templates = {
    verify_email : {
        subject                = "[your_app] Verify your account"
        template_relative_path = "/_templates/emails/auth0/verify-email.html"
    }
}
Available template types:
verify_email(Verification Email (Link))verify_email_by_code(Verification Email (Code))reset_email(Change Password (Link))welcome_email(Welcome Email)blocked_account(Blocked Account Email)stolen_credentials(Password Breach Alert)enrollment_email(Enroll in Multifactor Authentication)mfa_oob_code(Verification Code for for Email MFA)user_invitation(User Invitation)
Reference
locals {
    ...
    auth0 = {
        enabled = true
        // (required) Name of your project, it'll be visible on sign-in/sign-up page
        project_name = "Runtyme Kit"
        // (optional) By setting this to 'true' you forbid users to sign-up to your platform, this might be a case when
        // you'd want to have users created from Stripe flow, or users being invited
        // default: false
        disable_signup = false

        // (optional) This is the Site URL that will be used as base URL for a Magic Link
        // default: https://localhost:3000, no wildards (*) allowed
        site_url = "https://runtyme.co"
        // (optional) Tell Auth0 here that this URL is safe to redirect users to after they attempt log out
        after_logout_url = "https://runtyme.co/sign-in"

        // optional
        otp = {
            // IMPORTANT: To enable Passwordless flow in Auth0's Universal Login page, `auth0.password.enabled` must be set to false
            // otherwise Username + Password flow will be used by default
            enabled = false
            // (optional) Time after Magic Link will expire and will no longer be valid
            // default: 3600 - 1h, Minimum: 60
            expire_in = 3600
            // (optional) Number of generated characters for OTP auth
            // default: 6, Minimum: 4, Maximum: 40
            code_length = 6
            // (required) Subject of an email sent when passwordless flow is triggered
            email_subject = "[your_app] Your Magic Link"
            // (required) Contents of an email sent when passwordless flow is triggered
            email_template_relative_path = "/_templates/emails/auth0/otp.html"
        }

        // optional
        password = {
            enabled = false
            // (optional) Specific Auth0 password policy, available values: 'none', 'low', 'fair', 'good', 'excellent'
            policy = "good"
            // (optional) Passwords shorter than this value will be rejected as weak.
            // default: 8, Minimum 1, Maximum 128, recommended 8 or more.
            min_length = 8
        }

        // (optional)
        // Possible values (and the name of it in Auth0 dashboard):
        // - verify_email         (Verification Email (Link))
        // - verify_email_by_code (Verification Email (Code))
        // - reset_email          (Change Password (Link))
        // - welcome_email        (Welcome Email)
        // - blocked_account      (Blocked Account Email)
        // - stolen_credentials   (Password Breach Alert)
        // - enrollment_email     (Enroll in Multifactor Authentication)
        // - mfa_oob_code         (Verification Code for for Email MFA)
        // - user_invitation      (User Invitation)
        email_templates = {
            verify_email : {
                subject                = "[your_app] Verify your account"
                template_relative_path = "/_templates/emails/auth0/verify-email.html"
            }
            reset_email : {
                subject                = "[your_app] Reset Your Password"
                template_relative_path = "/_templates/emails/auth0/reset-password.html"
            }
            user_invitation : {
                subject                = "[your_app] You have been invited"
                template_relative_path = "/_templates/emails/auth0/invite-user.html"
            }
        }

        // (optional) Specify custom SMTP server for Auth0 emails
        //    NOTE: If empty, default shared Auth0 server will be used, not recommended for production application
        smtp = {
            // (optional) If set to 'true' AND 'sendgrid.enabled=true', configured SendGrid SMTP server will be used
            // default: false
            use_sendgrid = false
        }
    }
    ...
}